安装Hexo
首先检查电脑中是否存在以下应用程序:
1.Git
2.Node.js
终端输入以下命令,检查是否已安装相应程序:1
2
3
4$ git --version
git version 2.7.4
$ node -v
v12.2.0
安装Node.js
如果本电脑中有Node.js,可以跳过此步骤;若没有nodejs,则需要先安装.1
2
3
4
5
6
7
8
9
10
11
12
13
14
15
16//安装nodejs和npm
$ sudo apt-get install nodejs-legacy
$ sudo apt-get install npm
//升级npm为最新
$ sudo npm install npm@latest -g
//安装用于安装nodejs的模块n
$ sudo npm install -g n
//通过n模块安装指定的nodejs
$ sudo n latest
$ sudo n stable
$ sudo n lts
//查看版本
$ node -v
v12.2.0
$ npm -v
6.9.0
安装Hexo
使用npm安装Hexo:1
$ npm install -g hexo-cli
1. ps: 使用npm安装可能会出现“npm ERR! code E404”错误,没关系,多试几次就行
2. 若出现以下警告,暂时可以忽略:1
2npm WARN optional SKIPPING OPTIONAL DEPENDENCY: fsevents@1.2.9 (node_modules/hexo-cli/node_modules/fsevents):
npm WARN notsup SKIPPING OPTIONAL DEPENDENCY: Unsupported platform for fsevents@1.2.9: wanted {"os":"darwin","arch":"any"} (current: {"os":"linux","arch":"x64"})
最后测试是否安装完成:1
2
3
4
5
6
7
8
9
10
11
12
13
14
15
16
17
18
19$ hexo --version
hexo-cli: 1.1.0
os: Linux 4.15.0-43-generic linux x64
node: 12.2.0
v8: 7.4.288.21-node.17
uv: 1.28.0
zlib: 1.2.11
brotli: 1.0.7
ares: 1.15.0
modules: 72
nghttp2: 1.38.0
napi: 4
llhttp: 1.1.3
http_parser: 2.8.0
openssl: 1.1.1b
cldr: 35.1
icu: 64.2
tz: 2019a
unicode: 12.1
本地调试Hexo
初始化Hexo本地文件夹
执行下列命令,Hexo会在指定文件夹中新建所需的文件,本博客以为musing_blog为例:1
2
3
4
5$ cd ~/
$ mkdir musing_blog
$ hexo init musing_blog
$ cd musing_blog
$ npm install
安装完成后,在终端输入以下命令,最后在浏览器中输入网址http://localhost:4000, 可以看到hexo页面.
Github Page托管
这里假设你已经有了github账号,并且为本机地址配置了SSH,如果没有,可以参考我的csdn博客:ubuntu16下github配置
测试github连接是否成功1
$ SSH -T git@github.com
连接成功后,在github上建立一个仓库(repository),仓库名称必须为[github_user].github.io 。例如,本博客建立的仓库名为musing93.github.io
Hexo与github远程关联
配置Deployment
找到musing_blog文件夹下的_config.yml,修改其中的相关代码如下:
#Deployment
##Docs: https://hexo.io/docs/deployment.html
deploy:
type: git
repo: git@github.com:Musing93/Musing93.github.io.git
branch: master
本地部署,并提交文件到github
终端输入以下命令:1
2
3
4#删除旧的public文件
$ hexo clean
#生成新的public文件
$ hexo generate
若想先本地查看1
2#本地使用浏览器查看博客
hexo s
若要在网页上查看:1
2#开始部署
hexo deploy
ps:使用deploy需要先安装相关部件:1
$ npm install hexo-deployer-git --save
最后在浏览器中输入[https://github_user.github.io] (https://github_user.github.io) 就可以看到你的简单博客了。可能需要等待一段时间才能访问的,例如本文使用https://musing93.github.io 访问。
更换主题
下载主题
hexo中所有主题可在这里找到;
下载其中的next主题,并将主题放置~/musing93_blog/themes目录下1
$ git clone https://github.com/iissnan/hexo-theme-next.git ~/musing_blog/themes/next
修改主题
修改主目录 ~/musing93_blog 下的_config.yml文件,将theme改为next:1
2#theme: landscape
theme: next
ps: theme这类栏目的冒号后面要有一个空格
再修改themes/next目录下的_config.yml文件,选择需要使用的主题:
#—————————————————————
#Scheme Settings
#—————————————————————
#Schemes
#scheme: Muse
#scheme: Mist
scheme: Pisces
#scheme: Gemini
ps:本博客选用了next主题的Pisces风格
博客的本地测试与云端查看
博客通常有本地测试与云端查看两种方式,为了简化以后的操作,可以将相应的终端命令写成bash文件。
本地测试bash文件
blog_localtest.sh:1
2
3
4
5
6
7
8
hexo clean
hexo generate
hexo s
hexo clean
hexo generate
hexo s
在终端输入以下命令即可在网址http://localhost:4000中查看博客1
$ sh blog_localtest.sh
云端查看
将博客传到github可以运行blog_push.sh文件,浏览器中输入网址:https://musing93.github.io访问。
blog_push.sh:1
2
3
4
hexo clean
hexo generate
hexo deploy
博客的多端同步
在主电脑中已经建立好了博客,那么在其他电脑上如何查看和编辑呢?
通过github可以实现多端同步,在任意电脑上查看、编辑、更新博客!
前期配置
主电脑(A):
添加 /.deploy_git, /public 到.gitignore文件末尾,一个一行
初始化本地仓库,并建立本地仓库与远程仓库的连接:1
2$ git init
$ git remote add origin git@github.com:Musing93/Musing93.github.io.git
这里需要注意:如果自己使用的主题是克隆下来的,先把主题下的.git文件夹和.gitignore文件删除,不然git上传不上去
如果直接提交,显然会和github上的文件产生冲突、覆盖,因此可以建立github分支hexo,所有的博客更新操作都在分支上进行:1
2
3
4
5
6
7
8
9#添加所有本地文件
$ git add .
#git 提交
$ git commit -m "备注"
# 新建分支并切换分支
$ git branch hexo
$ git checkout hexo
# 最后push文件到github的hexo分支上
git push origin hexo
多端同步更新
remarkable安装
博客使用markdown语法编写,这里推荐一款markdown编辑器-remarkable
首先下载remarkable的deb安装包,安装:1
2
3
4
5$ dpkg -i remarkable_1.87_all.deb
$ sudo apt-get update
$ sudo apt-get upgrade
$ sudo apt-get install -f #补足缺失的软件包
$ remarkable &
主电脑建立博客并推送到git云端
1 | $ hexo n new |
编写完博客后,将本地更新推送到云端1
2
3
4
5$ hexo clean
$ hexo d -g
$ git add .
$ git commit -m "更新test"
$ git push origin hexo
为了方便每一次的更新,可以将推送到云端的命令写成bash文件:
hexo_git.sh :1
2
3
4
5
6
hexo clean
hexo d -g
git add .
git commit -m "备注"
git push origin hexo
或者带参数的hexo_git_paramerter.sh
hexo_git_paramerter.sh:1
2
3
4
5
6
hexo clean
hexo d -g
git add .
git commit -m $1
git push origin hexo
终端输入下面命令将本地推送到云端:1
2
3sh hexo_git.sh
#或者
sh hexo_git_paramerter.sh "备注"
副电脑下载git文件并更新
- 在副电脑配置好node.js、git、npm,并配置好git的ssh。
- 下载文件到本地:
1
$ git clone -b hexo git@github.com:musing93/musing93.github.io
3、 对应文件夹下安装npm1
$ npm install
- 新建博客并推送
1
2
3$ hexo n new3
$ cd sh
$ sh hexo_git.sh
博客详细配置
到此为止,已经初步实现了博客的功能;接下来对博客进行美化。
侧边栏添加标签、类别等
标签(tags),时间表(schedule)、类别(categories)、关于(about)
找到next主题下面的_config.yml文件,找到其中的menu配置代码,去掉tags和schedule、categories、about的注释,修改如下:
menu:
home: / || home
about: /about/ || user
tags: /tags/ || tags
ategories: /categories/ || th
archives: /archives/ || archive
chedule: /schedule/ || calendar
在musing_blog/source文件夹下建立tags与schedule、categories、about文件夹:1
2
3
4$ hexo n page tags
$ hexo n page schedule
$ hexo n page categories
$ hexo n page about
其他栏目,如about、sitemap等同理。
运行之前写的本地测试文件查看效果:1
$ sh blog_localtest.sh
更换语言与头像
- 更换语言
在musing93_blog目录下的_config.yml文件中修改语言zh-Hans,修改如下:#Site
title: Hexo
subtitle:
description:
keywords:
author: John Doe
language: zh-Hans
timezone:
目前Next支持如下主题:
| code | language |
|---|---|
| en | 英语 |
| zh-Hans | 大陆简体 |
| zh-Hant-HK | 港澳繁體 |
| zh-Hant-TW | 台灣正體 |
- 修改头像
在musing93_blog目录下的_config.yml文件中修改头像地址:
avatar: /images/avatar.png
ps:头像地址可以自己新建文件夹,只要路径对就行。最好将自己加入的图片放在自建的文件夹内
设置首页不显示全文(只显示预览)
在musing93_blog目录下的_config.yml文件中修改:
auto_excerpt:
enable: true
length: 150
分类和标签设置
这里主要说的是在编写文章的时候,怎么给文章设置标签和分类。
首先通过hexo n “name”命令来新建一个页面,在source/_posts目录下找到刚才新建的name.md文件,用remarked打开文件,文件内容如下:
title: name
date: 2019-05-29 13:45:10
tags:
页面默认就是长这样的,可以编辑标题、日期、标签和内容,但是没有分类的选项。我们可以手动加入categories:项,但是下次创建新的页面的时候还是没有,所以我们直接打开scaffolds/post.md文件,在tages:上面加入categories:,保存后,重新执行hexo n ‘name’命令,会发现新建的页面里有categories:项了:
title: name
date: 2019-05-29 13:50:25
tags:
在编辑文章的时候,tags:后面是设置标签的地方,如果有多个标签的话,可以用下面两种办法来设置:
第一种:
tages: [标签1,标签2,…标签n]
第二种:
tages:
- 标签1
- 标签2
…
- 标签n
使用编写好的本地测试sh文件测试,发现博客虽然知道有多少个标签和分类,但是无法显示,最后使用如下方法解决:
在sourse/tags路径下的文件index.md中加入:(缺少了type说明)
-–
title: tags
date: 2019-05-28 17:36:37
type: tags
-–
同理,/source/categories下的index.md中加入:
-–
title: categories
date: 2019-05-29 13:55:58
type: categories
-–
此外还发现,在文章的分类下,若categories配置如下时:
categories:
- test
- test.test
则会生成分类test以及其子类test.test:

侧边栏社交、打赏、访问统计以及背景设置
打开/theme/next/下的_config.yml文件。
打赏:
修改相应代码,图片路径可以自定义:
#Reward
reward_comment: 坚持原创技术分享,您的支持将鼓励我继续创作!
wechatpay: /my_images/wechatpay.png
alipay: /my_images/alipay.png
打赏功能可能存在闪动的bug需要进行修复:
修改next/source/css/_common/components/post/post-reward.styl,注释掉以下代码:1
2
3
4
5
6
7
8
9
10
11
12
13
14
15
16
17/*
#wechat:hover p{
animation: roll 0.1s infinite linear;
-webkit-animation: roll 0.1s infinite linear;
-moz-animation: roll 0.1s infinite linear;
}
#alipay:hover p{
animation: roll 0.1s infinite linear;
-webkit-animation: roll 0.1s infinite linear;
-moz-animation: roll 0.1s infinite linear;
}
#bitcoin:hover p {
animation: roll 0.1s infinite linear;
-webkit-animation: roll 0.1s infinite linear;
-moz-animation: roll 0.1s infinite linear;
}
*/
订阅公众号
wechat_subscriber:
enabled: true
qcode: /my_images/mywechat.png
description: 欢迎您扫一扫上面的微信公众号,订阅我的博客!(目前尚未开通公众号0 0)
访问量统计
busuanzi_count:
# count values only if the other configs are false
enable: true
# custom uv span for the whole site
site_uv: true
site_uv_header: 访客数
site_uv_footer: 人
# custom pv span for the whole site
site_pv: true
site_pv_header: 总访问量
site_pv_footer: 次
# custom pv span for one page only
page_pv: true
page_pv_header: 阅读数
page_pv_footer:
并在themes/next/layout/_partial/footer.swig开头添加如下代码1
<script async src="//busuanzi.ibruce.info/busuanzi/2.3/busuanzi.pure.mini.js"></script>
继续在该文件中添加访客统计代码:1
2
3
4
5
6{% if theme.footer.counter %}
<script async src="//busuanzi.ibruce.info/busuanzi/2.3/busuanzi.pure.mini.js"></script>
<span id="busuanzi_container_site_pv">本站总访问量<span id="busuanzi_value_site_pv"></span>次</span>
<span class="post-meta-divider">|</span>
<span id="busuanzi_container_site_uv">本站访客数<span id="busuanzi_value_site_uv"></span>人</span>
{% endif %}
配置背景
首先下载背景图片:http://90sheji.com/taobao/256836.html】(http://90sheji.com/taobao/256836.html)
放到 hexo(hexo工程文件)-> themes -> next -> source -> images 的路径下;
hexo(hexo工程文件)-> themes -> next -> source -> css -> _custom ,找到路径下的custom.styl文件,在文件的最上方加上一代码 body { background:url(/images/backGround.jpg(这是你之前加的背景图片的名字));}就完事了。
(地址可以自己指定)
###关联评论系统
参考官方:http://theme-next.iissnan.com/third-party-services.html#yungentie
最后运行之前写好的同步文件,即可本地查看博客、也可同步到云端!
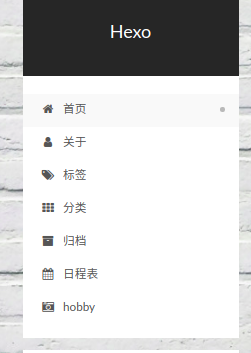
侧边栏及图标设置
要在侧边栏添加自定义栏目,可参见以下步骤(以加入hobby栏目为例):
在主题下的_config.yml文件中修改:
1
2
3
4
5
6
7
8
9
10menu:
home: / || home
about: /about/ || user
tags: /tags/ || tags
categories: /categories/ || th
archives: /archives/ || archive
schedule: /schedule/ || calendar
hobby: /hobby/ || camera-retro
#sitemap: /sitemap.xml || sitemap
#commonweal: /404/ || heartbeat修改图标
图标的别名可在图标库中查找:图标库
例如,相机图标的别名为camera-retro
因此第一步中hobby修改的图表名为 camera-retro
建立文件
1
$ hexo n page hobby
找到hobby文件夹下的index.md文件,修改如下:
title: 爱好
date: 2019-05-30 15:05:14type: hobby
修改后博客的侧边栏如图所示:
注意事项
问题1:安装nvm出现“nvm is already installed in /home/jk/.nvm, trying to update using git”
解决办法1(卸载nvm):1
2
3
4
5
6
7
8
9
10
11
12
13
14
15
16
17
18
19
20
21
22
23
24
25#Remove nvm,you need to know the nvm path you install .
sudo rm -rf ~/.nvm
hash -r
#Remove latest node version
sudo npm uninstall -g n
#Remove n
cd ~/src/n && sudo make uninstall && cd .. && sudo rm -r n
#Remove latest nodejs version
sudo apt-get purge -y nodejs npm
#Remove nodejs-legacy version
sudo apt-get purge -y nodejs-legacy npm
sudo apt -y autoremove
#Remove nodejs files
sudo rm -rf /usr/local/lib/node_modules/npm
sudo rm -rf /usr/local/lib/node_modules/n
sudo rm -f /usr/local/bin/node
sudo rm -f /usr/local/bin/npm
sudo rm -f /usr/bin/node
sudo rm -rf /usr/local/n/versions/node
问题2:git提交时报警告“Changes not staged for commit:”
大概率是运行git commit 、 git add 或包含git命令的bash代码时,终端所在的路径不对,应该在musing_blog目录下运行git命令,这样才能提交所有变化的文件!
问题3: 博客中插入的图片在本地能显示,网页端无法显示。
解决办法1
1.修改主目录下的_config.yml:1
psot_asset_folder: true
2.安装图片上传插件1
$ npm install hexo-asset-image --save
3.建立博客1
$ hexo n "new"
在目录下会发现不仅生成了对应的new.md文件,还生成了同名的文件夹new。将需要上传的图片放入该文件夹。
4.插入图片
图片的插入格式为

以下为错误的插入格式:./new/2.png/new/2.png
解决办法2
将图片上传到github,通过插入相应的链接来引用图片
博客的优化功能还有许多,目前也只是实现了博客的基本内容,后续再继续更新吧!